Showing posts with label sewing space. Show all posts

Friday, April 3, 2015

Janome Horizon Memory Craft 8900 QCP Sewing Machine

Janome Horizon Memory Craft 8900 QCP
Meet my new machine!  I've named her Rose, named after Eleanor Roosevelt, because I am a history nerd and I really admire her.  Rose is a Janome Horizon Memory Craft 8900 QCP.  That's a mouthful, and most of the time I just refer to her as a Janome 8900.

I purchased my Janome from Sew Vac City of College Station, TX at QuiltCon this year.  I'll admit it was mostly an impulse buy.  They were running a great special, and because I had been considering a new machine since Fall Quilt Market, I just went for it.

Janome Horizon Memory Craft 8900 QCP


I'm not going to go into all the specs because that's available all over the internet.  But I do want to compare it to my previous machine, a starter Brother XR-9000 (which I believe is now called Brother XR-9500PRW - Project Runway edition).  Which I still totally recommend to anyone that asks me what machine they should get for their first one.  Seriously, that machine is a workhorse.  Had I not wanted to work on my free motion quilting skills and start making large quilts, I probably never would have upgraded.

Janome Horizon Memory Craft 8900 QCP

I was always hesitant to get a "fancy" machine because they seemed very complicated to me, like a rocket ship.  I think this Janome is a good blend of the features I wanted in a fancy machine, and the simplicity I loved with my starter machine.

Janome Horizon Memory Craft 8900 QCP

After using Rose for about a month, I'm ready to share my preliminary list of things I like about this machine:
  • I like that the bobbin is just a drop in plastic bobbin.  No intimidating metal bobbin case.  Yes, those intimidate me!  
  • Although I haven't quilted anything very large yet, I really like the large harp space.  This thing boasts 11 inches.  That's huge!
  • I like the automatic thread cutter.  I am finally starting to get used to the motion of pushing the little scissors instead of picking up my snips to cut thread.
  • I love the Start/Stop button alternative to the foot pedal.  I am finally teaching my 4 year old son to sew and he's loving it.  I am too.
  • I'm obsessed with all the storage.  Like embarrassingly obsessed.  What can I say, I love organization!
Janome Horizon Memory Craft 8900 QCP

In this past month, I've found some things that I'm not sure of yet.  It might be a feature I am not impressed with or just an area where I need more practice with a more complicated machine:
  • I have a lot of trouble winding bobbins.  I waste a lot of thread trying to get it right.  I follow all the steps in the manual, but I'm still getting loosely wound bobbins that sometimes get pretty tangled up.  I'll eventually get a bobbin wound that works, but it's a little frustrating.
  • I cannot chain piece without breaking thread.  This is by far the most frustrating thing I'm trying to figure out with this machine.  Every single time I try to feed fabric under the foot while chain-piecing, the top thread breaks.  I've figured out that it happens when the edge of the fabric grazes the needle while it's still down.  So I to combat the problem, I have to slow down and make sure the needle is all the way up before the fabric gets near it.  I didn't have to do anything like this with my Brother, so I am just at a loss.
  • I'm not sold on the knee bar thing.  It's not positioned right to be useful for me.  It's like I can't reach it or something.  I do have really short legs so maybe it's just not for me.  I've tried it a few times but I just don't get it.  I'm not mad at it though.
  • It's really super heavy.  The table I sew on is also my desk.  I keep the machine on an oldrotary mat so I can easily slide it back to fit my laptop down for work.  In my old house, I sewed on the dining table where we ate dinner every night.  This machine would not be practical for having to move it every time I wanted to sew before dinner the way my little Brother was.
So far I'm happy with my purchase, despite my current issues.  I would definitely purchase again if I could go back in time.  But I'd love to be able to figure the things I'm having trouble with.  I'm certain most are due to user-error, because I'm so used to using a lower-end machine.

Do you have any tips for me to help me where I'm struggling with this machine?  Please tell me!

Wednesday, March 18, 2015

Studio Tour: Inside My Creative Space

I believe work spaces should be functional, of course, but why shouldn't they be pretty as well?


Workspace


We moved into our new home in September 2014.  One of the reasons we chose the home that we did was because it had ample space for a studio for me to do my thing and run my shop.  In our previous home, while I was fortunate have a dedicated space, it just wasn't big enough to house the business I was trying to grow.  The new studio is about 200 sq. ft. and has an incredible amount of light for most of the day thanks to two large sliding glass doors.  It also boasts a pretty view of the backyard, which comes in handy since I work at home with a preschooler and a rambunctious dog.  It is so nice to supervise playtime and get fresh air while I work.


Stash


Here is where I keep my personal stash of fabrics.  I mostly buy fat quarters, and they fit perfectly in this little hutch on the wall.  I have larger cuts and fabrics that I've deemed special in the white boxes.  My rulers and scissors hang from bars that hang handily on the wall over the cutting table.  The vintage machine was a Craigslist find, and needs to visit the sewing machine doctor.  The antique sewing box (stacked drawer thing) was a gift from my dad.

Hutch: Ikea Hemnes (might not be available anymore)
White boxes: Ikea (similar)
Rails, hooks, hanging basket: Ikea Bygel series


Scrap-Storage


This little console table has a drawer that fits my scraps perfectly.  It's nice to have them tucked away because I find it hard to keep them looking tidy.  I try to keep a pretty small stash, so I don't typically have a lot of scraps.  I love scrappy quilts too, so it's easy to keep using them up.

Table: gifted, don't know the source
Plastic scrap baskets: Target (hint: kids storage aisle has Circo brand pink or navy handles for about 50 cents cheaper than the green handled Sterilite brand in the container aisle.  Same exact container.)

Sewing-Area


My sewing area also serves as my office area where I write and do shop bookkeeping.  I'd like to sew some cushions for the chair and add rolling casters to the bottom.  My desk is an old Ikea Expedit with the table attachment.  I store works in progress in the white boxes on the shelves below the table top.

Desk unit: Ikea Expedit (similar)
Chair: Home Goods
Magnet board: Ikea (similar in silver)


Office-Area


To the right of my sewing/office chair, I have a small bookcase.  I keep some books on it, but mostly it holds office-y type stuff.  I keep the most-used items on the top for easy access.  Since my business is online, it is easy for me to keep almost everything I need stored on a cloud.  My phone and laptop are invaluable and without them I wouldn't be able to run the business at all.  Paperwork waiting for action and filing hangs out in the paper clip stand.

Phone: Samsung Galaxy S4 (hoping to upgrade to a Note 4 soon!)
File box & folders: Target, office supply aisle
Paperclip stand: Target Dollar Spot


Reading-Corner


I set up this little reading nook recently while I was procrastinating on other things.  My husband had moved the chair into my studio from the living room so that he could do some work with me.  I decided to leave it in here and move it to this corner because it was so cute.  I keep my embroidery supplies in the box under the chair.

Chair: Target
Side table: Ikea


Gallery-Wall


This gallery wall might be my favorite part of the room.  I filled it with special things that make me smile whenever I see them.

Be Inspired print: Bijou Lovely
You Are Enough and Happiness is Handmade: Pen and Paint
Black frames: Ikea Ribba
White frame: Ikea Nyttja


Design-Wall


My design wall is just a piece of white micro fleece tacked to the wall, but it works!  My son designed the quilt up there now and we're working on sewing it together.  I expect it to be up there for quite a while.


Cutting-Area


Here is my shop area.  We will be replacing the bookcases with something custom and more functional, but for now, they work.  The cutting table is two Expedit units pushed together.  It's still not big enough for my large cutting mats but I'm making it work until we put a larger table top together (soon!).

Bookcases: Ikea Billy
Cutting table: Ikea, similar


Cutting-Table


I keep all my shipping supplies on this handy little cart.  I've got empty shelves because I've been freeing up space for a large fabric shipment that should be delivered next week-ish.

Cart: Ikea Raskog

So that's how my studio looks when it's cleaned up and ready for a photo op.  Most of the time it is full of toys and tea cups and cut out pattern pieces and empty cardboard boxes and books open to project pages and a random sock and half-eaten open packages of peanut butter crackers.

I'm looking forward to making some improvements in here, like the aforementioned shelves and cutting table top, but also paint and possibly this faux-wood flooring.  I'm also looking into getting a TV to hang on a wall because we all like to hang out in here on the weekends and watch movies while I work and sew.


What is your sewing or office space like?  Drop me a link to a photo in the comments.  Do you have any favorite tips for keeping it functional and stylish?  I'd love to know.


Sunday, April 28, 2013

Antique Sewing Box


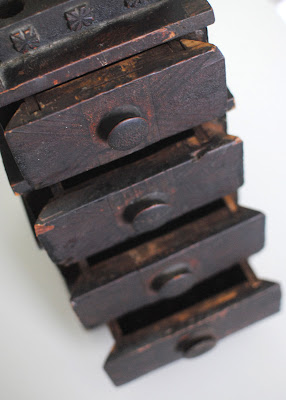
My dad recently sent me this great antique sewing box.


It has seen better days, I'm sure.  Above is supposed to be a pin cushion.  There are two little holes at the front - I have no idea what those are for.  The little nubs on the back are filled with a gritty substance, so I can only guess that they were for sharpening.


There are four drawers.  The top three are just boxes.  The bottom one has pegs for spools.  


The drawers are stacked in a way that it makes sort of a pyramid shape.  Look at those great little carved details at the top.


There are no markings on the bottom.  But you can see here that one of the feet was replaced.  I love the idea that this piece was so well-loved. 


And now it will continue to be well-loved.

Should I try to repair/replace the pin cushion on top?  What about the little spool pegs that are broken off?  Should I use this piece for it's intended purpose, or keep it as a show piece?  Lastly (I know, so many questions), can anyone tell me anything about it?  When was it made, where, etc?  I'd love to research the history of it a little more.

Sunday, January 13, 2013

Phase One Complete


Lots of photos in this post.  Sorry about the quality of the photo above, that's a cell phone pic because I was too lazy to change my camera lens to one that would let me get this whole side of the room in view.  The rest should be better, although the lighting isn't great because it's icky here.  But at least you can see all the yummy organization!

Sewing Room Reoganization

The cubby unit is three separate pieces (four counting the table top).  It's IKEA Expedit.  I like these because they're finished on all sides and have so many different possibilities regarding placement.  I can change them around later to suit my needs.

Fabric Storage

The storage boxes are IKEA Kassett (doesn't that remind you of Kaffe Fassett?!  Perfect for fabric).

Fabric Storage Detail

I have six boxes for fabric.  Each one has a set of colors in it (orange and yellow in one, pink and red and purple in another, for example).  I tend to buy small cuts (FQs and half yards) when I buy fabric, so these are just right for me.  I keep those folded in the back of the box where I can see them all, and then the scraps go in the open space in front.  I feel like this will be really helpful for me in just about every project I do.


You can see in this photo that instead of labeling the boxes, I decided to use a little scrap bit of fabric to depict what color group resides inside.  I love having yummy piles of fabric in sight aesthetically, but practically, it wasn't working for me (falling piles anyone?) so having a little bit of fabric showing as labels is fun.  And I can change them out whenever to freshen up the view.  I hear having fabric out of the light is better for it anyways.  Those are patterns in the metal box, and the two smaller boxes hold various trims and notions like zippers and ric rac, etc.


The cubbies over my cutting area are not as easy to get to since there's a table in the way.  So these hold things that I don't use too often.  The little plastic drawer unit holds extra sewing machine feet, needles, rotary cutter blades, and various other small supplies.  The shelf next to it holds some precuts, including my FQ bundle of Comma, there are also small jars behind that holding buttons and empty bobbins.  Below that is my mailing stuff.  That box is a card organizer from Hallmark (YEARS old) in which I keep stationery, stamps, and return address labels.  My address book is setting beside that and my monogram label embosser is in front (so now maybe I will use it more!).  The basket next to that is empty, and my idea is that I can throw scraps and remnants from cutting in there to be redistributed into their correct boxes later.  To keep things looking neat even when I don't feel like cleaning up after myself.  My sewing machine is up top when not in use.  The thread organizer there will eventually get screwed into the wall in that blank space between the pin board and the shelving unit.


Hanging here is a rail with some hooks and a basket for holding things I use when cutting.  Shears and rulers handily hang from hooks.  Tiny white flower pots (similar and cuter) hold my rotary cutters and marking utensils.  The small turntable rotary mat fits perfectly in the basket, while my large mat and ruler tuck neatly between the Expedit units when not in use.


This pin board was a score.  My husband's office was relocating from some temporary buildings when they were on location for a project, and they were throwing away a lot of office supplies and items.  This was in the trash pile!  It had a tiny bit of damage near one of the screw holes and a teeny tear in the cork, but we just used bigger screws to affix it to the wall.  Problem solved, free pin board!  The Expedit unit on its side is perfect for the tabletop ironing board.  It's also a nice place to display a jar with teeny bits of fabric I love (you know, the kind you cannot bear to throw away!).  Maybe one day I can make a ticker tape project with these bits.


In this corner you can see my fabric yardage.  I have those comic book boards that everyone likes to use to make mini bolts.  But I gotta be honest, I don't get what all the fuss is about.  I don't like them.  They are not sturdy at all  and bend, so they don't stand up on their own, and I feel like it's more work than just folding.  So I don't use them.  Oh well!  The big ironing board is tucked in the corner with some rolls of laminated cotton and oil cloth and a bolt of Ikea car yardage from ages ago (seen here on a pillowcase I made for the boy last night!).  The little guy's little table and chairs are here too.  (Can you tell yet that I'm a fan of IKEA?).


The box on the left holds my embroidery supplies.  Which so far, are not organized in that box.  The floss is still in skeins.  The box on the right is housing some kit type things.  A quilt kit I bought for some reason and will never make because I don't care for kits.  And a few scrappy kits that I put together (for a hand stitched postage stamp quilt) and that my sister put together for me as a gift using this tutorial.  Behind Little Red is where my camera and its bag and small tripod live.  The serger that my mom got from someone that was THROWING IT AWAY lives up top.  I have figured out how to thread it (which is supposed to be the hardest part?  It has arrows and is color coded for each spool printed on the machine, so that part was easy).  But I need to figure out the tension and the basics of just how to use a serger.  That tin houses selvages that have been trimmed off of yardage, waiting for a fun selvage project one day.


And lastly, here's my desk space.  The desk does not match, but it was super cheap at Walmart and maybe one day I will get around to painting it a super fun color.  Magnet board from Ikea.  This is where I blog!  On my pink laptop.  That is covered in Mater and McQueen stickers thanks to my son.  And sometimes sew here, but I'm going to let you in on a secret.  Even though I have this great space, I prefer to take my machine to the kitchen table and sew there.  It's a counter height table and I like to sew standing up. I know, weird.  :)

So there you have it.  If you're still with me after all the pictures and probably unnecessary detail, thanks!  I'd love to know what you think!

Friday, January 11, 2013

Plans for the Sewing Space

After thinking long and hard about my creating area after the post the other day about organizing my embroidery supplies, I've decided to completely overhaul my sewing space.  I feel like I just did this a few months ago, but it just wasn't working.  Well, it's kind of working, but not well enough.

Currently, I have almost the same set up as Jess from Stitched in Thyme.  I'm lacking the sideways Expedit that is laying down, but I do have the same upright one + table top as she does.  And by clicking through to her site, you can see how wonderful her space is!  So tomorrow morning, the we're headed to IKEA to get not just one, but two more Expedit units, as well as some more boxes to round out my storage space.

Here's a mock up of what I'm envisioning.  We'll call this Phase One:

Sewing Room West Wall
I already have the unit on the left, and it's already positioned there in the corner of the room.  The dark squares represent the portion of the unit that is under the table top (not pictured).  The pin board is already hanging on the wall.  The new additions will be the two other Expedit units (the upright one on the left, and the laying down one under the pin board).

Phase Two involves some minor construction, so it won't happen as spontaneously as Phase One.  We have a sliding door closet in this room, and the plan is to take off the doors and build shelving in the closet for more storage.  We'll also be installing a power outlet and wiring for the printers (or maybe we'll get a wireless printer router thing, who knows).  Ideally, the closet will neatly store the printers and any cardstock, "shipping and receiving" (mailing supplies for bee blocks, etc), and gift wrapping items.  I'd also like to have a shelf reserved for fabric on mini bolts.  You'll notice I have designated two cubbies (bottom left) for fabric on comic book board bolts, but I don't really care for that system and I'd like something sturdier.  Eventually.


Related Posts Plugin for WordPress, Blogger...